This article will guide you to configure Cudy Router step by step.
Common network topology:

Preparations:
1. Unplug your modem and move the backup battery if it has one.
2. Connect router's Internet port (Blue) to the powered-off modem via an Ethernet cable.
3. Power on the modem, and then wait about 2 minutes for it to restart.
4. Connect the power adapter to the router and wait the System LED turn to solid on (red or blue).
5. Connect your computer to the router via Wi-Fi or Ethernet.
6. Check the LEDs to confirm the hardware connection are correct.
Note: Please make sure you can access internet when you connect the computer directly to the modem. If it failed to get the internet, please contact your Internet Service Provider.
Step 1: Open a web browser and go to http://cudy.net or http://192.168.10.1.
For details, please refer to How to log into the web interface of Cudy Router?
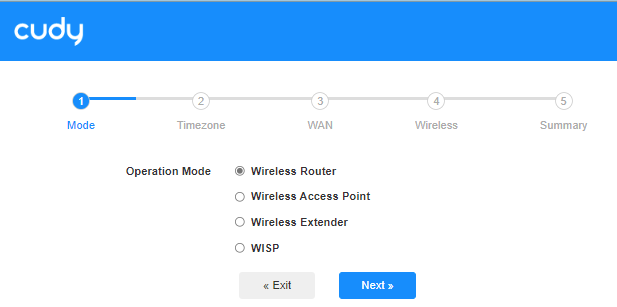
Step 2: The Quick Setup window will pop up, choose 'Wireless Router', then go 'Next'.

Step 3: Choose your 'Time Zone'.

Step 4: Here, we select 'DHCP' as the WAN Internet connection type. The system will auto detect the Internet connect type, you may have a try, but if it failed or not DHCP, please confirm the configuration details with your Internet Service Provider.

Or go to 'General Settings"->'WAN Mode', choose 'DHCP' as Internet connection type, then apply the settings.

 Step 5: Change the wireless network name and password or just keep them default.

 Step 6: Click 'Save & Apply' to complete the configuration.

 Step 7: Wait a few seconds, if it shows 'Connected' in 'System Status' page, then the internet is successfully setup.


43 comments
Нет доступа к интернету. Сделал все строго по инструкции, у меня идет кабель интернета из стены, все подключил, на сайте пишет во всех настройках «подключено», но интернета все равно нету, помогите
@Роман,
Уважаемый клиент,
Спасибо, что обратились в службу поддержки Cudy.
Пожалуйста, ознакомьтесь с этой статьей на веб-сайте, чтобы настроить функцию VPN-клиента на маршрутизаторе.
https://www.cudy.com/blogs/faq/how-do-i-set-the-vpn-client-to-access-a-remote-vpn-server?pos=2&_sid=6cd8c2311&ss=r
“Как включить vpn на роутере, нет инструкции”
Как включить vpn на роутере, нет инструкции
@Artyom
Уважаемый клиент,
Спасибо за обращение в службу поддержки Cudy.
Пожалуйста, выйдите из быстрой настройки, затем вы можете задать настройки WAN маршрутизатора.
“Здравствуйте, купил роутер wr1500 выбрал настройку через pppoe ввёл данные но кнопка далее почему то не нажимается, подскажите что делать”