This article will guide you to configure Cudy Router step by step.
Common network topology:

Preparations:
1. Unplug your modem and move the backup battery if it has one.
2. Connect router's Internet port (Blue) to the powered-off modem via an Ethernet cable.
3. Power on the modem, and then wait about 2 minutes for it to restart.
4. Connect the power adapter to the router and wait the System LED turn to solid on (red or blue).
5. Connect your computer to the router via Wi-Fi or Ethernet.
6. Check the LEDs to confirm the hardware connection are correct.
Note: Please make sure you can access internet when you connect the computer directly to the modem. If it failed to get the internet, please contact your Internet Service Provider.
Step 1: Open a web browser and go to http://cudy.net or http://192.168.10.1.
For details, please refer to How to log into the web interface of Cudy Router?
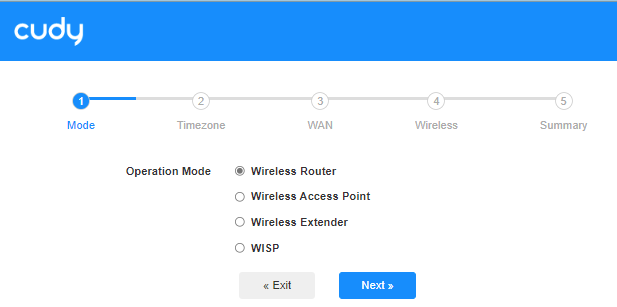
Step 2: The Quick Setup window will pop up, choose 'Wireless Router', then go 'Next'.
Step 3: Choose your 'Time Zone'.

Step 4: Here, we select 'DHCP' as the WAN Internet connection type. The system will auto detect the Internet connect type, you may have a try, but if it failed or not DHCP, please confirm the configuration details with your Internet Service Provider.

Or go to 'General Settings"->'WAN Mode', choose 'DHCP' as Internet connection type, then apply the settings.

 Step 5: Change the wireless network name and password or just keep them default.

 Step 6: Click 'Save & Apply' to complete the configuration.

 Step 7: Wait a few seconds, if it shows 'Connected' in 'System Status' page, then the internet is successfully setup.

41 comments
Маршрутизатор WR1500, последняя прошивка (2.3.0), установленная по инструкции из центра загрузок. При подключении через PPPoE видит подключение к WAN, но не может соединиться с провайдером. По информации провайдера якобы введен неверный пароль? хотя всё перепроверил несколько раз. Попытки перенастроек, смены пароля, замены кабелей не приводят к успеху, при этом на старом оборудовании с этими же логином/паролем всё работает. В чем может быть проблема?
Здравствуйте. Нет подключения умной розетки Сбер к роутеру WR1200E . К другим роутерам подключается. Частота стоит на роутере и розетки 2.4Гц. Блокировки нет, сеть открыта,
@Aleksey,
Уважаемый клиент,
Благодарим вас за обращение в службу поддержки Cudy.
Прошивка WR1500 отличается от прошивок других маршрутизаторов Cudy.
Вы можете попробовать сменить WEB-браузер для настройки роутера.
Кроме того, мы обновили прошивку, чтобы она была такой же, как и у других роутеров Cudy, вы также можете обновить последнюю прошивку и настроить его снова. Вы можете скачать последнюю версию прошивки WR1500 на сайте.
https://www.cudy.com/pages/download-center/wr1500-1-0
“Здравствуйте, я купил маршрутизатор AX1500. В настройках WAN интерфейса не нажимается следующая кнопка. Интерфейс настроек совершенно другой, нет раздела общих настроек.”
Здравствуйте, купил роутер AX1500. В настройке Интерфейс WAN не нажимается кнопка далее. Интерфейс настроек совершенно иной, раздела общие настройки нет.
@Chimwemwe,
Dear Customer,
Thank you for contacting Cudy support team. Our technical support has contacted you via email. Please check.
“Help me”